Tuesday, October 7, 2014

MCSA Exam Electives

Exam electives now available for MCSA: SQL Server and MCSA: Windows Server Certifications
Microsoft is offering more flexibility with MCSA exams. IT Professionals seeking a SQL Server 2012 MCSA or Windows Server 2012 MCSA will now have the flexibility to choose the subject matter of their final certification exam. This flexibility will allow IT Pros to select an exam that better aligns with their skills and interests.

The requirement of successfully completing three certification exams hasn’t changed, but the subject matter the third exam covers has. Four options are available to choose from for each MCSA. See the following chart for details.


Upcoming dates for SQL Server 2012 and Windows Server 2012 MCSA training at Centriq:

Windows Server 2012
Installing & Configuring Windows Server 2012 (MS-20410)
Start Dates: September 15, 2014 and November 3, 2015

Administering Windows Server 2012 (MS-20411)
Start Dates: September 29, 2014 and November 17, 2015

Server Virtualization with Windows Super Hyper-V & System Center (MS-20409)
Start Date: October 13, 2014

Configuring Advanced Windows Server 2012 (MS-20412)
Start Dates: November 10, 2014 and February 2, 2015

Managing Office 365 Identities & Services (MS-20346)
Start Dates: September 29, 2014 and December 15, 2014

Administering Microsoft SQL Server Databases (MS-20462)
Start Dates: September 29, 2014 and January 5, 2015


SQL Server
Querying Microsoft SQL Server (MS-20461)
Start Date: January 19, 2015

Administering Microsoft SQL Server Databases (MS-20462)
Start Dates: September 29, 2014 and January 5, 2015

Administering Windows Server 2012 (MS-20411)
Start Dates: September 29, 2014 and November 17, 2014

Configuring Advanced Windows Server 2012 (MS-20412)
Start Dates: November 10, 2014 and February 2, 2015

Implementing a Data Warehouse with Microsoft SQL Server (MS-20463)
Start Dates: October 27, 2014 and February 9, 2015

Programming in C# (MS-20483)
Start Dates: November 10, 2014 and February 16, 2015

Additional information provided by Microsoft:


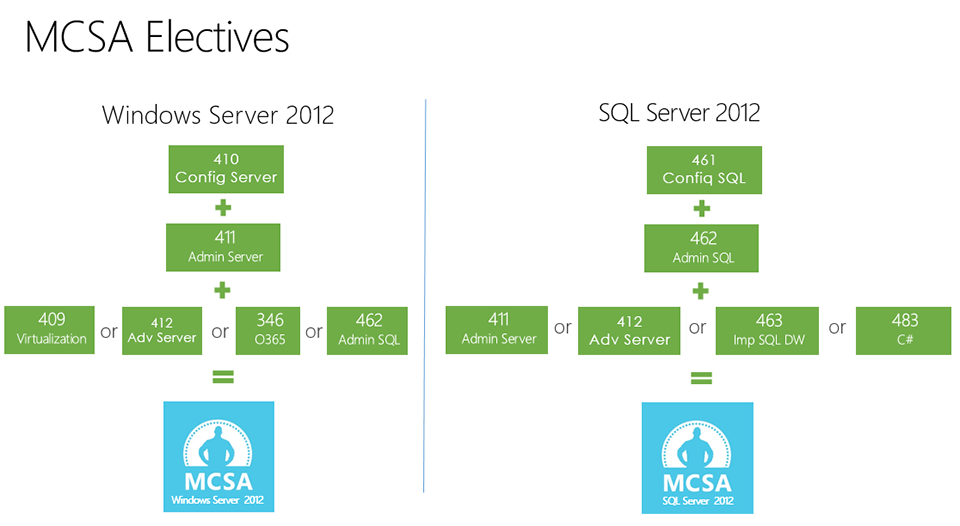
For MCSA: Windows Server 2012 > Exams 410 and 411 are required. You can choose one of the following exams to fulfill the requirements for the third exam in the path:
  • Exam 346: Managing Office 365 Identities and Requirements
  • Exam 409: Server Virtualization with Windows Server Hyper-V and System Center
  • Exam 412: Configuring Advanced Windows Server 2012 Services
  • Exam 462: Administering Microsoft SQL Server 2012 Databases

For MCSA: SQL Server 2012 > Exams 461 and 462 are required. You can choose one of the following exams to fulfill the requirements for the third exam in the path:
  • Exam 411: Administering Windows Server 2012
  • Exam 412: Configuring Advanced Windows Server 2012 Services
  • Exam 463: Implementing a Data Warehouse with Microsoft SQL Server 2012
  • Exam 483: Programming in C#
Please visit the following pages to see more information:

Wednesday, July 9, 2014

FileZilla FTP - Phase II - Maintenance and Subsites

The previous post introduced the idea of publishing your website to a remote server using FileZilla and FTP. An additional video demonstrates updating the same site using a new local website version (PersonalV2) with ASP.NET and adding various "sub-websites" hosted off the same domain (such as one called WG).

The latter will also require adding an "Application Root Directory" (aka Virtual Directory) through your GoDaddy/CentriqHosting settings. This allows the "sub-website" to be treated as its own application, with its own root web.config and its own independent root relative referencing. At the time of this post, setting an application root folder requires you to:

  • Launch your Hosting control panel,
  • Go to the More navbar option, click the IIS Management option from the fly-out menu
  • Create a new directory and name it, then check the "Set application root" checkbox.


As a brief sidenote, if you are going to use MVC for your root website, it's a best practice to ensure that certain elements are not inherited by the "sub-websites" that would cause conflicts:

    <!--So parent MVC app doesn't conflict with sub-websites-->
    <location inheritInChildApplications="false">
    </location>


Typical tags that cause conflicts in sub-websites (and that you'll want to wrap with the location tag above) are <system.web> and <connectionStrings>. Note also with the code above, Visual Studio may not provide Intellisense for the inheritInChildApplications attribute, but it works.

Check out the FileZilla FTP Phase II video:

Thanks, and go forth and publish content! As always, best wishes on your continuing career development!

Friday, June 27, 2014

FileZilla and FTP - Setup - Phase I

When we first learn to create websites by hand, we normally use some software to develop the code on our computer. The software might be as simple as Notepad, or it might be a feature-rich IDE, like Visual Studio or Dreamweaver. We test those files we created on that local computer, running them in various browsers. No one can see the results of our work till it's ready, because it hasn't been published. It's just being run locally, on that one computer.

Once I'm ready to publish/deploy my website for the world to enjoy over the Web, I need a domain name and a server to host it. If I'm not hosting the domain on my company's computers, I've probably paid a hosting provider (such as CentriqHosting, Arvixe, 1&1, etc.) to handle that part for me. Even so, I still need one more thing. I need to get my content (those files I've been testing locally) onto that remote server. Regardless of the tool you use to accomplish this, the protocol you use is usually FTP (File Transfer Protocol).

FileZilla (Client) is free, open-source software that lets you handle FTP uploads/downloads between two computers.

Check out the "FileZilla and FTP – Setup – Phase I" video below for a tutorial on using Filezilla to publish a website you've been working on locally to your remote, live webserver.


In a nutshell, here are those steps.

Create a Site Definition

A site definition saves all the settings you'll need to continue publishing your local website files out to the remote live server.

  • Go to: File menu, Site Manager...
  • Click: New Site, then name your new site definition
  • Fill out the General tab settings (your hosted FTP upload location, your FTP username and password, etc.)
  • Fill out the Advanced tab. Identify the location of your local website files (Default Local Directory) and the file path on your remote server for this site definition (Default Remote Directory)
  • You can then connect. In the future, this site definition is saved as a quick load option off the dropdown arrow directly underneath the File menu.


Upload Updated Content

  • Once you are connected (showing files in the local directory pane on the bottom left and showing files in the correct remote directory pane in the bottom right), you can upload any files or subfolders of new or updated content.
  • Simply select the new/updated files or folders on the left, then right click them for the Upload option, or drag them into the correct spot on the right.


Common Errors to Avoid

  • Getting file locations out of sync. Be sure you are uploading local files to the correct remote directory. If you have moved into a subfolder of your root directory to upload a file, be sure to navigate to the matching subfolder on the remote server before you upload - or you may be putting the file into the wrong remote directory.
  • Failing to update the remote server for local website restructuring. If you rename a file or folder locally, or move files to different folders in the website structure, it's up to you to manually make changes on the remote server to reflect those local changes (deleting files and folders with former names, moving files to the correct new folders, etc.)

Thanks, and be sure to check out the following video for "FileZilla, Phase 2", which tackles maintaining content and updating/adding site definitions. As always, best wishes on your continuing career development!

jQuery Crash Course –Part III ofthe HCJ Series

Back in June, 2013 (yes, that was a year ago) we published the final installment of the HCJ series in the Centriq Alumni Network newsletter.

Installment 3 provided an introduction to jQuery, including what it is and isn't, what the syntax looks like, and a few examples of jQuery in use.

You can access the piece in its entirety, as well as code samples:


Thanks, and best wishes on your continuing career development!